Absolute Beginner's Guide to Crochet
- Jul 21
- 10 min read
Updated: Jul 21
So, you want to learn how to crochet but don’t know where to start? Let me help!
Crochet can feel overwhelming at first, especially when patterns look like they’re written in another language. But every crocheter starts with the same basic stitches, and once you learn the foundations, things begin to click surprisingly quickly.
In this guide, I’ll walk you through the basic supplies, beginner crochet terms, first stitches, and common mistakes so you can confidently start your first project.

What you actually need to start
I know when I start a new hobby, I get overwhelmed trying to figure out what supplies are necessary. I don’t want to spend a bunch of money upfront in case I end up not liking the hobby.
Thankfully, crochet is a simple hobby to start. All you really need is yarn and a crochet hook.
If you're going to finish a project you will also want a yarn or tapestry needle.
There are a few other tools you can get to help but aren't completely necessary. These things you can either purchase or you might just have around your house. You can see my post here about my favorite supplies.
· scissors (or craft scissors)
· stitch markers (or safety pins/paperclips)
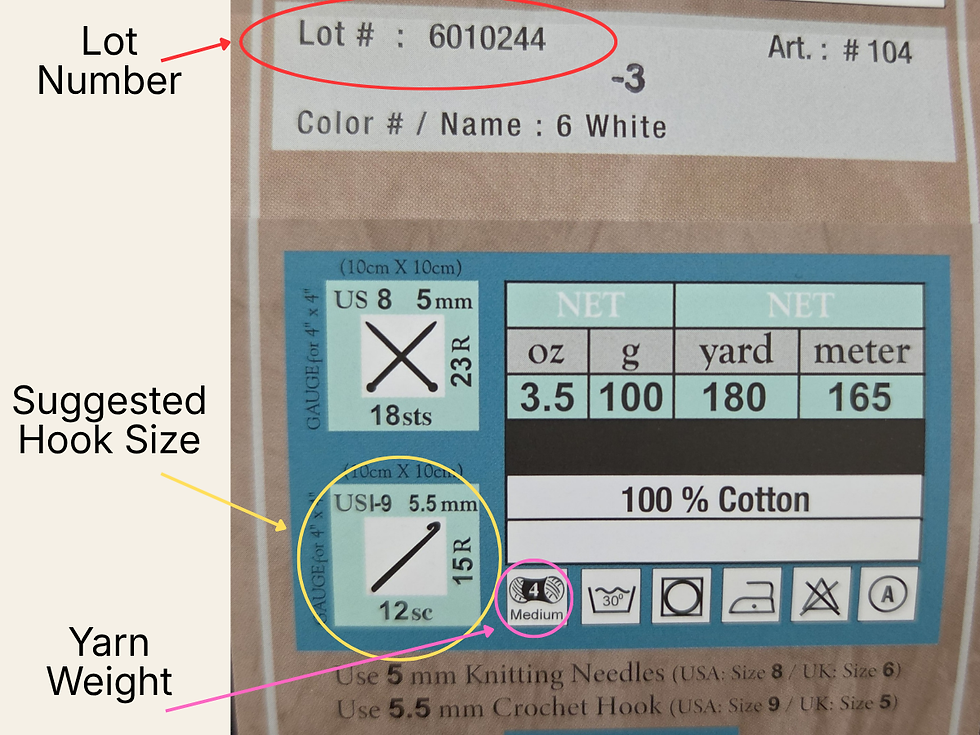
One thing you will need to be aware of is your crochet hook size and the yarn thickness. You can find my post here where I go into detail about each of these or just keep in mind you want to use yarn that is the appropriate thickness for your hook. There is a suggested hook size on the yarn label.
Choosing a yarn to start with
When choosing a yarn as a beginner I would suggest going with worsted weight.
If you’re just starting out, try to avoid black, fuzzy, or novelty yarns at first. They make stitches much harder to see and can be frustrating for beginners.
When the manufacturers create yarn, they dye it in different groups called “lots".
Even if a yarn color is called the same thing, there could be very subtle differences that you can only see when the different lots are right next to each other.

This is not super important unless you're doing a project like a blanket with large patches of yarn right next to each other. If you're doing patchwork where the colors are spread out dye lot won't make a huge difference.
Crochet terms and abbreviations
Sometimes looking at a pattern can seem like trying to read another language. Usually when you start a project, the designer will put their own abbreviations at the top of the pattern.
Below are the ones that are used most often. For a complete glossary of the stitch abbreviations I know of, check out my post here.
· ch - chain
· sc – single crochet
· hdc – half double crochet
· dc – double crochet
· st or sts – stitches
· yo – yarn over
Some of the common terms you might see as well are “right side" and “wrong side", “front post" and “back post", “front loop" and “back loop", “back bump".
“Front post”, “back post", “front loop" and “back loop" are all terms that have to do with more advanced stitches. You can read all about them in this post here.
“Right side" and “wrong side" are not always essential to a pattern. Sometimes it's important when doing tapestry crochet, mosaic crochet, or with wearables but usually for blankets, scarves and amigurumi if you can hide the ends, the right side and wrong side don't really matter.
When you're crocheting, the row you start on is the “right side”. Then you get to the end of that row and turn your project, you are now on the “wrong side" or the “back" of the project.
I'll be completely honest; I've never really had to be consciously aware of which side is the front and which side is the back.
The “back bump" is referring to a specific part of the chain stitch.

Sometimes when you're beginning a project, it's helpful to crochet into the back bump on the first row after the chain stitch to give your bottom edge the same kind of look as your top edge. Not always necessary, mostly a preference unless a pattern specifically calls for it.
You will also see different brackets or * in patterns. Again, check the pattern you are doing to see what each thing means but this is what they have usually meant in my experience.
Square brackets like this [ ] are usually the instructions for that row or round that will be repeated. In my patterns I will put the instructions in the brackets and then add “x4” or whatever number of times it needs to be repeated.
There will be a comma between instructions so if you see the square brackets with the x-number then a comma followed by another instruction, do the instructions in the brackets for the number of times and then move on to the next instruction.
I have also seen this being done with a symbol. Usually when I see that it will state clearly “repeat between * 4 times".
The other brackets that are used frequently are these ( ). In most patterns, these are used for two different purposes. Within the row or round, they indicate stitches that go together in one stitch.
For example: “sc, (dc, sc), sc" would mean to do a single crochet in the first stitch and then a double crochet and single crochet in the second stitch, then one more single crochet in the third stitch.
The other time you will see those brackets would be at the end of a row or round.
They usually just have a number inside them. This indicates the number of stitches in that round or row. This is an important indicator for keeping the right number of stitches in each row or round and preventing your project from shrinking or growing when it's not supposed to.
A turning chain is a certain number of chain stitches added at the end of a row or round to create height for the next row or round.

Sometimes it will count as a stitch, other times it won't. It is important to pay attention to pattern instructions, so you know whether to count it in your stitch count or not.
It is also important to know how many stitches to chain for your turning chain. Traditionally, many crocheters use a chain 2 or chain 3 turning chain for taller stitches. Personally, I prefer a shorter turning chain because I think it creates a cleaner edge with less gaps. You may need to experiment a little to see which method you prefer.
How to hold the hook and yarn
It is important to know that I am right-handed. You can find tutorials on how to crochet left-handed online.
First, you need to know there is no wrong way to hold the hook. For the most part, there are two schools of thought on holding the hook.
First is called the “pencil hold" and the second is called the “knife hold".

Again, let me stress there is no wrong way to hold the hook. You just need to be comfortable.
Just like holding the hook, there is no wrong way to hold the yarn either.
This is my preferred way of holding the yarn. I wrap the yarn around my pinkie, then bring it across the palm side of my hand and “hook" it with my index finger.
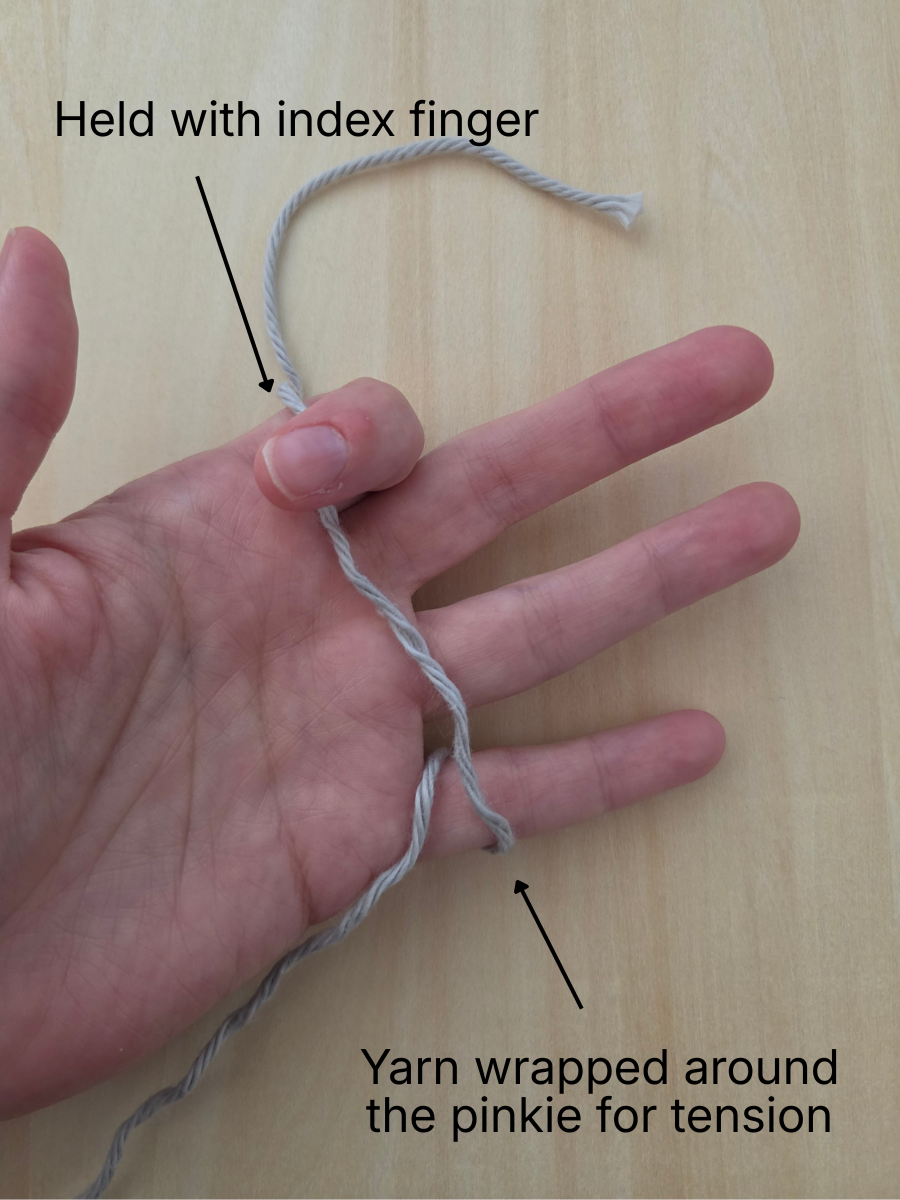
When I first started crocheting, my index finger would get cramped from holding it like that. In that case I would switch up my position and point my index finger out and control the tension in this way.

Another thing you can do is use a tension ring. This is a simple ring you can put on your finger to help keep your tension.
Again, there is no wrong way to hold your yarn. You just want to be able to control the tension, so your stitches are consistent.
The other thing to note is that the strand of yarn you are holding to control tension is also the strand that can unravel your project if you accidentally pull it.
When taking a break, it is a good idea to pull the loop out so it’s big to prevent accidental unraveling.
Or you can also add a stitch marker to the loop. This will also prevent accidental unraveling.
The first stitches to learn
There are plenty of stitches but let's go over how to do the most used.
Let's start with the very basic, first stitch that is the base of pretty much every type of project.
Chain Stitch (ch)
You start by making a slip knot with your yarn. Sometimes you will tie this to another part of the project, so you'll want to keep it kind of long. I usually keep it about 2 or 3 inches in length.
Place your hook inside the slip knot, “grab" the yarn with your hook and then pull it through the hole. This is one chain stitch.

Continue with this process for as many chain stitches as the pattern requires.
I like to move my hand up as the chain goes keeping it within 1 or 2 chains of where I'm currently working to keep my stitches nice and even.
You can attach any stitch to a chain.
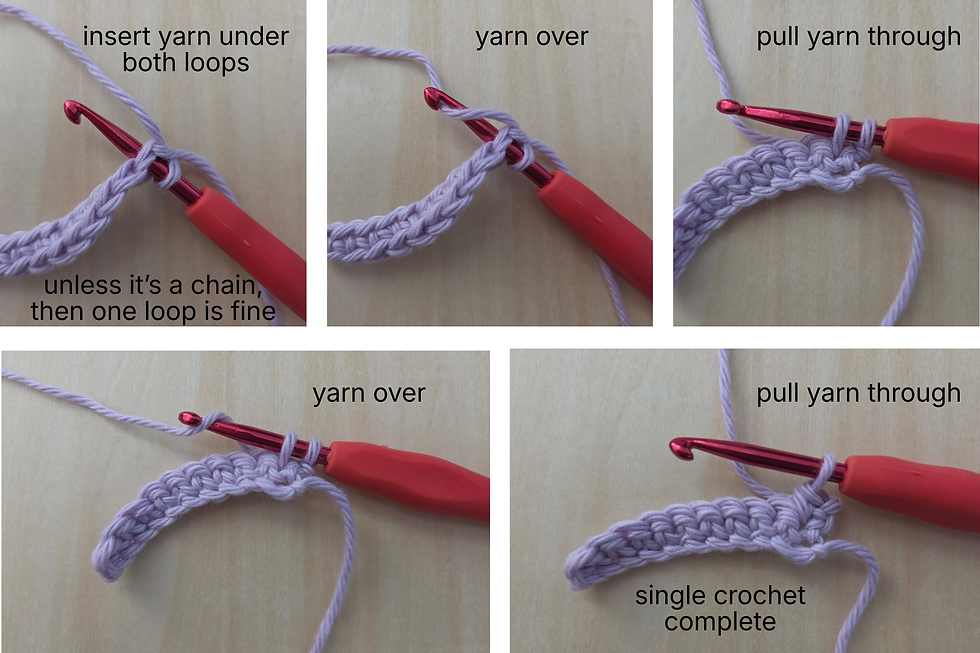
Single Crochet (sc)
insert your hook into the stitch or chain below
grab the yarn behind it (yarn over)
then pull that yarn through to the front (you will now have 2 loops on your hook)
yarn over your hook
pull that through the 2 loops on your hook
single crochet stitch complete
Half Double Crochet (hdc)
begin with a yarn over your hook
insert the hook into the indicated stitch
yarn over
pull that loop up through the stitch (you will have 3 loops on your hook)
yarn over and pull through all 3 loops
half double crochet stitch completed

Double Crochet (dc)
begin with a yarn over
then insert your hook into the indicated stitch
yarn over again
and pull that loop up through the stitch (you will now have 3 loops on your hook)
yarn over
and pull through 2 of those loops leaving 2 loops on the hook
yarn over again
and pull through the final 2 loops on your hook
double crochet stitch completed

Ending the project
When you’re done with your project you need to take care of that pesky end so all your hard work doesn’t become unraveled.
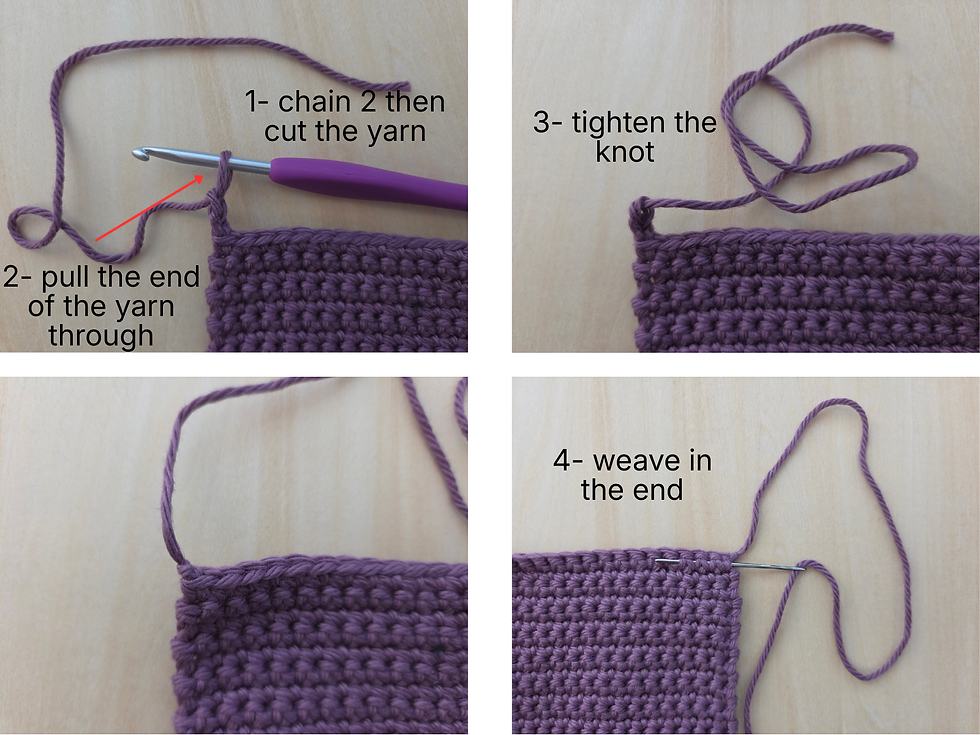
There are a variety of ways to do this, but my favorite is by chaining 2, then I cut the yarn leaving a decent sized tail, so the knot doesn’t come undone. Pull the end of the yarn through the final stitch, and finally tighten it by pushing down.
This will ensure the knot stays and your project will be secure. You can use a tapestry or yarn needle to weave that end into the project.
Common beginner mistakes
Ok what will invariably happen when you are just starting out is you will get a few rows down and realize your square is turning into a triangle, has developed waves or is curling. It's ok. These are typical things that happen to even seasoned crocheters and are easy to figure out even if they're not always fun to fix.
Issue 1: my square is turning into a triangle. This issue is usually a counting error.
I read somewhere once that you think you can count until you start crocheting and learn that you can't.
This absolutely is a mistake that happens to crocheters of every skill level and can be one of the most frustrating things.
One of the biggest reasons this happens is people confusing their turning chain as a stitch. Usually, the creator of the pattern will put in the instructions if the turning chain counts as a stitch or not.
Another way to help with your counting would be to put a stitch marker in the first stitch. A good rule of thumb even if it's obnoxious would be to count at the end of every row.
One other reason this could happen with a larger project is if you changed to a smaller hook mid project.
Issue 2: My project is wavy and loose or tight and curling!
This problem is most likely being caused by not using the correct size of hook for the yarn. If you look at the yarn label there will be a suggested hook size for that yarn.
One of the reasons that would be different would be if the pattern requires it.
For example, my fidget and amigurumi patterns I create use worsted weight yarn and a 3.5 mm hook. If I'm making a blanket with worsted weight yarn, I use a 5.5 or 6.0 mm hook because it helps with the drape of the blanket.
A good rule of thumb is to see what the pattern calls for and then do a sample swatch (just like our gauge swatch above) to see if it creates the kind of fabric you're wanting.
Encouragement section
Your first crochet projects will probably look imperfect and that's completely normal. Every experienced crocheter has lopsided projects hidden somewhere from when they first started.
Crochet is one of those hobbies where improvement sneaks up on you. One day you'll suddenly realize your tension is more even, your rows are straighter, and you no longer have to think about every stitch.
Don’t focus on making everything perfect right away. Focus on learning, experimenting, and enjoying the process.
Most importantly, don’t be afraid to unravel mistakes and try again. Every crocheter does it.
Your first project
Now let's work on your first project! I have included below a simple dishcloth pattern. The stitch we will be using is called the "Lemon Peel Stitch". You can find the complete tutorial here. It is important to use cotton yarn for this one because it is absorbent, washable and better suited to a dishcloth than acrylic yarn.

Materials
worsted weight cotton yarn
crochet hook size 5.5 mm
yarn needle
scissors
Finished size
approximately 7.5"x7.5" (remember yours might be different because you crochet differently than I do; just increase or decrease the number of stitches to adjust)
Pattern
chain 33
beginning in the second chain from the hook
hdc in the first stitch
sc in the second stitch
dc in the third stitch
repeat [sc, dc] across the row
hdc in the final stitch
chain 1
turn
Repeat until you've reached your desired height. There is no need to chain or turn at the end of the project. Tie off and weave in all tails (the one you finished with and the one from the beginning slip knot).
Congratulations! You are a crocheter!
Crochet Stitch Library is ad free and supported by readers. If this tutorial helped, you can Buy Me a Skein.

Comments